PCA-6148/6148L
Full-size 486 All-in-one
CPU Card with
Flash/RAM/ROM disk
Copyright Notice
This document is copyrighted, 1996, by Advantech Co., Ltd. All
rights are reserved. Advantech Co., Ltd., reserves the right to make
improvements to the products described in this manual at any time
without notice.
No part of this manual may be reproduced, copied, translated, or
transmitted in any form or by any means without the prior written
permission of Advantech Co., Ltd. Information provided in this
manual is intended to be accurate and reliable. However, Advan-
tech Co., Ltd. assumes no responsibility for its use, nor for any
infringements upon the rights of third parties which may result
from its use.
Acknowledgements
AMD is a trademark of Advanced Micro Devices, Inc.
Award is a trademark of Award Software International, Inc.
IBM, PC AT and VGA are trademarks of International Business
Machines Corporation.
®
Microsoft Windows and MS-DOS are trademarks of Microsoft
Corporation.
UMC is a trademark of Standard Microsystems Corporation.
Cyrix is a trademark of Cyrix Corporation.
Intel is a trademark of Intel Corporation.
Part No. 2006148010 2nd Edition
Printed in Taiwan March 1997
A Message to the Customer....
Advantech Customer Services
Each and every Advantech product is built to the most exacting
specifications to ensure reliable performance in the unusual and
demanding conditions typical of industrial environments. Whether
your new Advantech equipment is destined for the laboratory or
the factory floor, you can be assured that it will provide the
reliability and ease of operation for which the name Advantech has
come to be known.
Your satisfaction is our number one concern. Here is a guide to
Advantech’s customer services. To ensure you get the full benefit
of our services, please follow the instructions below carefully.
Technical Support
We want you to get the maximum performance from your prod-
ucts. If you run into technical difficulties, we are here to help. But
please consult this manual first.
If you still can’t find the answer, gather all the information or
questions that apply to your problem and, with the product close at
hand, call your dealer. Our dealers are trained and ready to give
you the support you need to get the most from your Advantech
products. In fact, most problems reported are minor and are able to
be easily solved over the phone.
In addition, free technical support is available from Advantech
engineers every business day. We are always ready to give advice
on application requirements or specific information on the
installation and operation of any of our products.
Product warranty
Advantech warrants to you, the original purchaser, that each of its
products will be free from defects in materials and workmanship
for one year from the date of purchase.
This warranty does not apply to any products which have been
repaired or altered by other than repair personnel authorized by
Advantech, or which have been subject to misuse, abuse, accident
or improper installation. Advantech assumes no liability as a
consequence of such events under the terms of this Warranty.
Because of Advantech’s high quality-control standards and
rigorous testing, most of our customers never need to use our
repair and replacement service. If an Advantech product ever does
prove defective, it will be repaired at no charge during the warran-
ty period. For out-of-warranty repairs, you will be billed according
to the cost of replacement materials, service time and freight.
Please consult your dealer for more details.
If you think you have a defective product, follow these steps:
1. Collect all the information about the problem encountered (e.g.
type of PC, CPU speed, Advantech products used, other
hardware and software used etc.). Note anything abnormal and
list any on-screen messages you get when the problem occurs.
2. Call your dealer and describe the problem. Please have your
manual, product and any other information readily available.
3. If your product is diagnosed as defective, obtain an RMA
(return material authorization) number from your dealer. This
allows us to process your return more quickly.
4. Carefully pack the defective product, a completely filled-out
Repair and Replacement Order Card and a photocopy of a
dated proof of purchase (such as your sales receipt) in a
shippable container. A product returned without dated proof of
purchase is not eligible for warranty service.
5. Write the RMA number visibly on the outside of the package
and ship it prepaid to your dealer.
Packing list
Before you begin installing your card, please make sure that the
following materials have been shipped:
• 1 PCA-6148/6148L CPU card
• 1 6-pin mini-DIN keyboard & PS/2 mouse adapter
• 1 Hard disk drive (IDE) interface cable (40 pin)
• 1 Floppy disk drive interface cable (34 pin)
• 1 Parallel port adapter (26 pin) and COM2 adapter (9 pin) kit
• 1 Utility disk with system BIOS,VGA BIOS and SSD Setup
Utility
• 1 Utility disk with SVGA program and driver for Windows
(PCA-6148 only)
If any of these items are missing or damaged, contact your
distributor or sales representative immediately.
Contents
Chapter 1: Hardware Configuration ..................................................... 1
Introduction ......................................................................................... 2
Specifications ..................................................................................... 2
System ............................................................................................ 2
Local bus VGA interface ................................................................. 3
Mechanical and environmental....................................................... 4
Board layout ....................................................................................... 5
Jumpers and connectors .................................................................... 6
Safety precautions ............................................................................. 8
Jumper settings .................................................................................. 9
How to set jumpers ......................................................................... 9
CPU Jumper Settings ................................................................... 10
CPU type select ............................................................................ 11
Watchdog timer (J5) ..................................................................... 16
COM2 settings for RS-232/422/485 (J15) .................................... 16
CMOS backup select .................................................................... 16
IRQ12 setting................................................................................ 16
SSD Device Select [ J14 (U12), J16 (U16), J19 (U28)] ............... 17
BATTERY Select (J7) ................................................................... 17
SSD I/O address select (J17, J18) ............................................... 17
Chapter 2: Connecting peripherals .................................................................. 19
PCA-6148 Jumpers and Connectors List ......................................... 20
Safety Precautions ........................................................................... 20
IDE connectors (CN3) ...................................................................... 21
Flat panel interface connection (CN1) .............................................. 21
Flat panel display connector (CN1) .................................................. 21
Floppy drive connector (CN4) .......................................................... 22
Parallel port connector (CN5) ........................................................... 22
Keyboard & PS/2 mouse connectors (CN14, CN16)........................ 23
Reset switch (J1) .............................................................................. 24
Hard disk drive LED (DLE1) ............................................................. 24
VGA display connector (CN9) .......................................................... 24
Serial Ports ....................................................................................... 24
RS-232 connection (CN15) .......................................................... 25
RS-232/422/485 connection......................................................... 25
Power connectors (CON1) ........................................................... 27
CPU cooling fan power connector (CN2) ..................................... 27
Infrared Tx/Rx Header (CN8) ....................................................... 28
External Speaker (CN7) ............................................................... 28
Power LED and Keylock (CN6) .................................................... 29
Chapter 3: AWARD BIOS SETUP .............................................. 31
Entering setup .............................................................................. 32
Standard CMOS setup ................................................................. 33
BIOS features setup ..................................................................... 34
CHIPSET features setup .............................................................. 38
Internal Flash/ROM Disk .............................................................. 38
Video BIOS Cacheable................................................................. 39
System BIOS Cacheable .............................................................. 39
Power management setup............................................................ 40
Doze Mode................................................................................ ... 41
Standby Mode............................................................................... 42
Suspend Mode.......................................................................... ... 42
Important Notice ........................................................................... 43
Load BIOS defaults ...................................................................... 44
Load setup defaults ...................................................................... 44
Password setting .......................................................................... 44
IDE HDD auto detection ............................................................... 44
Save & Exit setup ......................................................................... 44
Exit without saving ........................................................................ 44
Chapter 4: VGA Display Software/Hardware Configuration........... 45
Introduction ....................................................................................... 46
PCA-6148 Utility Disk ....................................................................... 46
VGA Display Software Configuration ............................................... 47
Chapter 5: SVGA Setup ........................................................................ 49
Simultaneous display mode ............................................................. 50
Sleep mode....................................................................................... 50
Software support .............................................................................. 51
Driver installation .............................................................................. 52
Windows setup ............................................................................. 53
AutoCAD R12 ............................................................................... 56
Lotus 1-2-3 and Lotus Symphony ................................................ 58
VESA ............................................................................................ 60
Word ............................................................................................. 61
WordPerfect .................................................................................. 62
Appendix A: Flash/RAM/ROM Solid State Disk................................ 65
Memory devices................................................................................ 66
Drive capacity ................................................................................... 67
Drive configuration............................................................................ 67
Drive Selection ................................................................................. 69
Solid State Disk (SSD) Formatting: .................................................. 70
Formatting the Solid State disk .................................................... 70
Booting from the Flash/RAM/ROM disk............................................ 71
Inserting memory devices................................................................. 71
SSD Jumper Setting ......................................................................... 72
SSD Device Select [ J14 (U12), J16 (U16), J19 (U28)] ............... 72
SSD I/O address select (J17, J18) ............................................... 72
SRAM Battery Source (J7) ............................................................... 72
File copy utility .................................................................................. 73
Using a memory manager (EMM386.EXE) ...................................... 74
Appendix B: Programming the Watchdog Timer .............................. 75
Appendix C: Upgrading ........................................................................ 77
Installing PC/104 modules (CN12,CN13) ......................................... 78
Installing DRAM (SIMMs) ................................................................. 80
SIMM Configurations ........................................................................ 80
Supported 36 bit Memory Configurations (single bank) ............... 81
Appendix D: Detailed system information .......................................... 83
Parallel/printer connector (CN5)................................................. .. 84
HDD connector (CN3)................................................................ .. 84
VGA display connector (CN9) ...................................................... 86
Flat panel display connector (CN1) .............................................. 86
RS-232 connections ..................................................................... 87
Appendix E: POST LEDs ..................................................................... 93
1
Hardware
Configuration
This chapter gives background informa-
tion on the PCA-6148/6148L. It then
shows you how to configure the card to
match your application and prepare it for
installation into your PC.
Sections include:
• Card specifications
• Board layout
• Safety precautions
• Jumper settings
Chapter 1 Hardware Configuration 1
CHAPTER
Introduction
The PCA-6148/6148L is a full-size CPU card which allows the use of
VGA and other enhanced I/O interfaces. This card uses an 80486
series DX, DX2, DX4 or 5x86 CPU and accommodates up to 128 MB
DRAM. It also provides a secondary level 256/512 KB cache RAM.
The PCA-6148/6148L offers power management features to mini-
mize power consumption. It complies with the "Green Function"
standard and supports three power saving features: doze, sleep, and
suspended mode.
Its high performance VGA display supports an optional CRT and
panel displays with a display memory of up to 1 MB and a resolution
of up to 640x480 with 16.7 million colors. The VGA controller is a
VL bus C&T 65545/48/50, which comes equipped with a windows
accelerator.
The PCA-6148/6148L also offers several industrial features such as a
63-level watchdog timer with jumperless setup, a 1.44 MB Flash/
ROM disk, and a face-up PC/104 connection for additional functions
with PC/104 modules.
The PCA-6148/6148L is a highly reliable CPU card perfect for IPC
applications or machine control.
Specifications
System
• CPU:
Intel 80486DX/DX2/DX4 series
AMD 80486DX2/DX4 series, 5x86
Cyrix 80486DX2/DX4 series, 5x86
• BIOS: AWARD Flash BIOS, supports plug & play
• Chipset: VIA VT82C496G
• Secondary level cache: 256 (standard)/ 512KB (optional)
2 PCA-6148/6148L User's Manual
• Green function: Supports power management option via BIOS,
activated by keyboard or mouse activity. Supports doze, sleep, and
suspended mode. APM 1.1 compliant
• RAM: 1 MB to 128 MB, four 72-pin SIMM socket, accepts 1, 2, 4,
8, 16, and 32 MB SIMMs
• EIDE interface: Supports up to two IDE devices. BIOS supports
larger than 528 MB HDD and up to 8.4 GB. 32-bit host data
transfer, PIO Mode 3 transfer capabilities (>10 MB/sec)
• Floppy disk drive interface: Supports up to two floppy disk
drives, 5¼" (360 KB and 1.2 MB) and/or 3½" (720 KB, 1.44 MB,
and 2.88 MB)
• Parallel port: One enhanced parallel port, supports SPP/EPP/ECP
parallel mode
• Serial ports: Two 16C550 UARTs, one RS-232, one RS-232/422/
485 interface
• Watchdog timer: 63-level timer interval, jumperless setup,
generates system reset or IRQ15
• Flash/RAM/ROM disk: 1.44 MB solid state disk, MS-DOS
compatible, using Flash/ROM, SRAM and ROM device
• Keyboard/ PS/2 mouse connector: A 6-pin mini DIN connector
is located on the mounting bracket for easy connection of a key-
board or a PS/2 mouse. An on-board keyboard 5-pin male key-
board header connector is also available.
• I/O bus expansion: PC/104 connector with face-up installation
Local bus VGA interface (PCA-6148 only)
• Controller: VL-bus C&T 65545/48/50 VGA controller with
Windows accelerator
• Display memory: 1 MB on-board DRAM
• Display resolution (optional):
-Supports panel resolutions up to 1024x768 and 800x600
-Supports non-interlaced CRT monitors, 1024x768 with
256 colors
Chapter 1 Hardware Configuration 3
-True-color and Hi-color display capability, resolutions
up to 640x480 with 16.7 million colors
• Display output: DB-15 VGA connector, 22x2 pin header general
purpose flat panel display connector
• Display BIOS: default CRT/Toshiba TFT panel BIOS, Flash BIOS
can be easily updated
• DRAM Module: 50,60,70 ns
Mechanical and environmental
• Power supply: +5 V, @3.5 A
o o
• Operating temperature: 32 to 140 F (0 to 60 C)
• Board size: 338mm x 122mm
4 PCA-6148/6148L User's Manual
Board layout
CON1* CN9 CN15 CN16
J15
CN5
CN10 CN11
CN4
CN13
J19
J14 J16
CN8
J18
J17 CN12
CN3
J20
CN2
CN1*
J3
J11
J13
J2
J4
J6
JRN3
J10
JRN2
J9
JRN1
J8
+ J5
DLE1
J1
CN7
CN6
SIM0
SIM1
SIM2
SIM3
*PCA-6148 only
PCA-6148/6148L PCB Layout
Chapter 1 Hardware Configuration 5
Jumpers and connectors
Connectors on the board link it to external devices such as hard disk
drives, a keyboard, or floppy drives. In addition, the board has a
number of jumpers which you use to configure it for your application.
The table below lists the function of each of the board jumpers and
connectors. Later sections in this chapter give instructions on setting
jumpers and detailed information on each jumper setting. Chapter 2
gives instructions for connecting external devices to your card.
PCA-6148/6148L Jumpers
Number Function
J1 Reset
J2 Reserve
J3 CPU select
J4 CPU select
J5 Watchdog select
J6 Reserve
J7 Battery select
J8 CPU frequency select
J9 CPU frequency select
J10 CPU frequency select
J11 CPU voltage select
J12 CMOS erase
J13 CPU voltage select
J14 SSD memory select
J15 COM2 RS-232/422/485 select
J16 SSD memory select
J17 SSD I/O address select
J18 SSD I/O address select
J19 SSD memory select
J20 IRQ 12 setting
DLE1 LED
JRN1 CPU Select
JRN2 CPU Select
JRN3 CPU Select
6 PCA-6148/6148L User's Manual
PCA-6148/6148L Connectors
Number Function
*CN1 Flat panel display connector
CN2 fan power connector
CN3 IDE connector
CN4 floppy connector
CN5 parallel port connector
CN6 power LED and keylock connector
CN7 external speaker
CN8 infraredTx/Rx header
*CN9 VGA display connector
CN10 COM2 RS-232 connector
CN11 COM2 422/485 connector
CN12 PC-104 connector
CN13 PC-104 connector
CN14 external keyboard connector
CN15 COM1 RS-232 connector
CN16 keyboard/PS/2 connector
CON1 power connector
U1 CPU socket
U12 SSD memory
U16 SSD memory
U28 SSD memory
*:PCA-6148
Chapter 1 Hardware Configuration 7
Safety precautions
Follow these simple precautions to protect yourself from hard and
your PC from damage:
Warning! Always completely disconnect the power cord from
your chassis whenever you are working on it. Do not
make connections while the power is on, sensitive
electronic components can be damaged by the
sudden rush of power. Only experienced electronics
personnel should open the PC chassis.
Caution! Always ground yourself to remove any static charge
before touching the CPU card. Modern electronic
devices are very sensitive to static electric charges.
Use a grounding wrist strap at all times. Place all
electronic components on a static-dissipative
surface or in a static-shielded bag when they are not
in the chassis.
8 PCA-6148/6148L User's Manual
Jumper settings
This section tells how to set the jumpers to configure your card. It
gives the card default configuration and your options for each jumper.
After you set the jumpers and install the card, you will also need to
run the BIOS Setup program (discussed in Chapter 3) to configure
the serial port addresses, floppy/hard disk drive types and system
operating parameters. Connections, such as hard disk cables, appear
in Chapter 2.
For the locations of each jumper, see the board layout diagram
depicted earlier in this chapter.
How to set jumpers
You configure your card to match the needs of your application by
setting jumpers. A jumper is the simplest kind of electric switch. It
consists of two metal pins and a small metal clip (often protected by a
plastic cover) that slides over the pins to connect them. To “close” a
jumper you connect the pins with the clip. To “open” a jumper you
remove the clip. Sometimes a jumper will have three pins, labeled 1,
2 and 3. In this case you connect either pins 1 and 2 or 2 and 3.
3
2
1
Open Open Open Open Open Closed Closed Closed Closed Closed Closed 2-3 Closed 2-3 Closed 2-3 Closed 2-3 Closed 2-3
You may find pair of needle-nose pliers useful for setting the jumpers.
If you have any doubts about the best hardware configuration for your
application, contact your local distributor or sales representative
before you make any changes.
Chapter 1 Hardware Configuration 9
CPU Jumper Settings
Voltage
5V 3.3V 3.45V 3.6V
51
51 51 51
J11
62 62 62
62
51 51 51
J13 N/A
62 62
62
Frequency
25M 33M 40M
1
1
1
J8
1
1 1
J9
1
1
1
J10
10 PCA-6148/6148L User's Manual
CPU type select
In order for the system to function properly, the jumpers must be set
to accommodate the CPU installed on the CPU card.
CPU type select
CPU Type Voltage Frequency J3 J4 JRN1 JRN2JRN3
Cyrix 3.45V* 33M*
5x86-100
Cyrix 3.45V* 40M*
5x86-120
AMD 3.3V* 33M*
DX2-66
(NV8T)
*Please refer to jumper settings on page 10 of chapter 1
Chapter 1 Hardware Configuration 11
CPU type select
CPU Type Voltage Frequency J3 J4 JRN1 JRN2 JRN3
AMD 3.3V* 33M*
DX4-100
(NV8T)
AMD 3.3V* 33M*
DX4-100
(SV8B)
AMD 3.3V* 40M*
DX4-120
(SV8B)
AMD 3.3V* 33M*
5x86-133
*Please refer to jumper settings on page 10 of chapter 1
12 PCA-6148/6148L User's Manual
CPU type select
CPU Type Voltage Frequency J3 J4 JRN1 JRN2 JRN3
SGS 5V* 33M*
DX2-66
SGS 3.3V* 33M*
DX4-100
Intel 5V* 33M*
DX-33
Intel
DX2-50 5V* 25M*
*Please refer to jumper settings on page 10 of chapter 1
Chapter 1 Hardware Configuration 13
CPU type select
CPU Type Voltage Frequency J3 J4 JRN1 JRN2 JRN3
Intel 5V* 33M*
DX2-66
Intel 3.3V* 33M*
DX4-100
Cyrix 5V* 33M*
DX2-66
Cyrix 3.6V* 40M*
DX2-80
*Please refer to jumper settings on page 10 of chapter 1
14 PCA-6148/6148L User's Manual
CPU type select
CPU Type Voltage Frequency J3 J4 JRN1 JRN2 JRN3
Cyrix 3.45V* 33M*
DX4-100
*Please refer to jumper settings on page 10
Chapter 1 Hardware Configuration 15
Watchdog timer (J5)
Watchdog timer system reset/IRQ15 select (J5)
Reset (default) IRQ15
11
JP5
COM2 settings for RS-232/422/485 (J15)
COM2 settings for RS-232/422/485
RS-232 (CN10) RS-422 (CN11) RS-485 (CN11)
1
1 1
J15
5 5
5
(default)
CMOS backup select
Battery Backup Clean CMOS
(default)
JP12
3 2 1
3 2 1
IRQ12 setting
PS2 Mouse IRQ12
(default)
1
1
JP20
16 PCA-6148/6148L User's Manual
SSD Device Select [ J14 (U12), J16 (U16), J19 (U28)]
J14 (U12) J16 (U16) J19 (U28)
Flash open open open
ROM open open open
SRAM closed closed closed
BATTERY Select (J7)
Battery Installation Setup (J7)
Pin None (default) Internal 4 pin external 2 pin external
1 SSD power
2 Internal battery
- +
- +
3 SSD Power
4 1 4 1 4 1 4 1
4 GND
SSD I/O address select (J17, J18)
SSD J17 J18
disabled closed closed
210H open closed
220H closed open
230H open open
Chapter 1 Hardware Configuration 17
18 PCA-6148/6148L User's Manual
2
Connecting
peripherals
This chapter tells how to connect periph-
erals, switches and indicators to the PCA-
6148/6148L board. You can access most
of the connectors from the top of the
board while it is installed in the chassis. If
you have a number of cards installed, or
your chassis is very tight, you may need
to partially remove the card to make all
the connections.
CHAPTER
PCA-6148/6148L Jumper and Connector List
PCA-6148/6148L Connectors
Number Function
*CN1 Flat panel display connector
CN2 fan power connector
CN3 IDE connector
CN4 floppy connector
CN5 parallel port connector
CN6 power LED and keylock connector
CN7 external speaker
CN8 infraredTx/Rx header
*CN9 VGA display connector
CN10 COM2 RS-232 connector
CN11 COM2 422/485 connector
CN12 PC-104 connector
CN13 PC-104 connector
CN14 external keyboard connector
CN15 COM1 RS-232 connector
CN16 keyboard/PS/2 connector
CON1 power connector
*:PCA-6148 only
The following sections tell how to make each connection. In most
cases, you will simply need to connect a standard cable.
Safety Precautions
Warning! Always completely disconnect the power cord from
your chassis whenever you are working on it. Do not
make connections while the power is on. Sensitive
electronic components can be damaged by the
sudden rush of power. Only experienced electronics
personnel should open the PC chassis.
Caution! Always ground yourself to remove any static charge
before touching the CPU card. Modern electronic
devices are very sensitive to static electric charges.
Use a grounding wrist strap at all times. Place all
electronic components on a static-dissipative surface
or in a static-shielded bag when they are not in the
chassis.
20 PCA-6148/6148L User's Manual
IDE connectors (CN3)
You can attach two IDE (Integrated Device Electronics) drives to
the PCA-6148/6148L's internal controller. The PCA-6148/6148L
CPU card has an EIDE connector, CN3.
Wire number 1 on the cable is red or blue, the other wires are gray.
Connect one end to connector CN3 on the CPU card. Make sure
that the red (or blue) wire corresponds to pin 1 on the connector
(on the right side). See Chapter 1 for help finding the connector.
Unlike floppy drives, IDE hard drives can connect in either
position on the cable. If you install two drives, you will need to set
one as the master and one as the slave. You do this by setting the
jumpers on the drives. If you use just one drive, you should set it
as the master. See the documentation that came with your drive for
more information.
Connect the first hard drive to the other end of the cable. Wire 1
on the cable should also connect to pin 1 on the hard drive
connector, which is labeled on the drive circuit board. Check the
documentation that came with the drive for more information.
Connect the second drive as described above on CN3.
Flat panel interface connection (CN1)
Flat panel display connector (PCA-6148 only)
CN1 consists of a 44-pin, dual-in-line header. The PCA-6148
provides a bias control signal on CN1 which can be used to control
the LCD bias voltage. It is recommended that the LCD bias
voltage (+5V) and panel video signals are stable. Under normal
operation the control signal (ENAVEE) is active high. When the
PCA-6148/6148L's power is applied, the control signal is low until
just after the relevant flat panel signal is present.
Configuration of the VGA interface is done completely via the
software utility. You don't have to set any jumpers. Refer to
Chapter 4 for software setup details.
Chapter 2 Connecting peripherals 21
Floppy drive connector (CN4)
You can attach up to two floppy disk drives to the PCA-6148/
6148L's on-board controller. You can use any combination of
5.25"
(360 KB and 1.2 MB) and/or 3.5" (720 KB, 1.44 MB and 2.88
MB) drives.
The card comes with a 34-pin daisy-chain drive connector cable.
On one end of the cable is a 34-pin flat-cable connector. On the
other end are two sets of floppy disk drive connectors. Each set
consists of a 34-pin flat-cable connector (usually used for 3.5"
drives) and a printed-circuit-board connector (usually used for
5.25" drives). You can use only one connector in each set. The set
on the end (after the twist in the cable) connects to the A: floppy.
The set in the middle connects to the B: floppy.
Parallel port connector (CN5)
The parallel port is normally used to connect the CPU card to a
printer. The PCA-6148/6148L includes an on-board parallel port,
accessed through a 26-pin flat-cable connector, CN5. The card
comes with an adapter cable which lets you use a traditional DB-
25 connector. The cable has a 26-pin connector on one end and a
DB-25 connector on the other, mounted on a retaining bracket.
The bracket installs at the end of an empty slot in your chassis,
giving you access to the connector.
To install the bracket, find an empty slot in your chassis. Unscrew
the plate that covers the end of the slot. Screw in the bracket in
place of the plate. Next, attach the flat-cable connector to CN5 on
the CPU card. Wire 1 of the cable is red or blue, and the other
wires are gray. Make sure that wire 1 corresponds to pin 1 of CN5.
Pin 1 is on the right side of CN5.
22 PCA-6148/6148L User's Manual
Keyboard & PS/2 mouse connectors (CN14,
CN16)
CN16, the card's keyboard connector, is a 6-pin mini-DIN connec-
tor on the card mounting bracket. The PCA-6148/6148L also
comes with an adapter to convert to a standard DIN connector and
to a PS/2 mouse connector.
CN16
The PCA-6148/6148L provides a second connector designed for
external keyboard input (CN14). To locate CN14 and CN16,
please see the board layout on page 5 of chapter 1.
Chapter 2 Connecting peripherals 23
Reset switch (J1)
You can connect an external switch to easily reset your computer.
This switch restarts your computer as if you had turned off the
power, then turned it back on. Install the switch so that it closes
the two pins of J1.
Hard disk drive LED (DLE1)
You can connect a LED to connector DLE1 to indicate when the
HDD is active. Marks on the Board layout (chapter 1, p. 5)
indicate LED polarity.
VGA display connector (CN9)
The PCA-6148 provides a VGA controller for high resolution
VGA interface. CN9 is a DB-15 connector for VGA monitor input.
Serial Ports
The PCA-6148/6148L offers two serial ports: COM1 in RS-232,
COM2 in RS-232/422/485. These ports let you connect to serial
devices (a mouse, printers, etc.) or a communication network.
You can select the address for each port (3F8H [COM1], 2F8H
[COM2] or 2E8H) or disable it, using the BIOS Advanced Setup
program, covered in Chapter 3.
The card mounting bracket holds the serial port connector for the
one port, and the parallel port and serial port adapter kit (supplied
with the card) holds the connector for the other port. This lets you
connect and disconnect cables after you install the card. The DB-9
connector on the bottom of the bracket is the first RS-232 port,
COM1. The DB-9 connector on the adapter kit is the second serial
port, COM2.
24 PCA-6148/6148L User's Manual
Serial port connections (CN15, CN10, CN11)
Connector Address
CN15 (COM1)RS-232
CN10 (COM2)RS-232
CN11 (COM2)RS-422/485
RS-232 connection (CN15)
Different devices implement the RS-232 standard in different
ways. If you are having problems with a serial device, be sure to
check the pin assignments for the connector. The following table
shows the pin assignments for the card's RS-232 port:
RS-232 connector pin assignments
Pin Signal
1 DCD
2RX
3TX
4 DTR
5 GND
6 DSR
7 RTS
8 CTS
9RI
5 9
6
1
CN15
RS-232/422/485 connection
COM2 is an RS-232/422/485 serial port. The following table
shows the pin assignments for COM2.
Chapter 2 Connecting peripherals 25
RS-232/422/485 connector pin assignments (CN10, CN11)
Pin RS-232 (CN10) RS-422/485 (CN11)
1 DCD TX - or send data - (DTE)
2 RX TX + or send data + (DTE)
3 TX RX + or receive data + (DTE)
4 DTR RX - or receive data - (DTE)
5 GND GND
6 DSR DSR
7 RTS RTS
8 CTS CTS
9RI RI
2 2
1 1
4 4
3 3
6 6
5 5
8 8
7 7
9 10 9 10
CN10 CN11
26 PCA-6148/6148L User's Manual
Power connectors (CON1)
If you prefer not to acquire power through PCA-6148/6148L's
backplane via the gold H-connectors, J1 also provides power input
connectors for +5 V and ±12 V.
Warning! Before making the connection, make sure the
voltage is absolutely correct and matched with
the right connector.
GND
GND
-12V
+12V
+5V
NC
CON1
CPU cooling fan power connector (CN2)
The CN2 is a connector for the CPU cooling fan. It provides both
+5V and +12V when the power is on.
CPU cooling fan power connector (CN2)
Pin Function
1 +5V
2 GND
3 +12V
1
CN2:
+12 GND +5
Chapter 2 Connecting peripherals 27
Infrared Tx/Rx Header (CN8)
This connector supports the optional wireless transmitting and
receiving infrared module. This module mounts onto a small
opening on system cases that support this feature. You must also
configure the setting through BIOS setup to select whether
UART2 is directed for use with COM2 or IrDA.
IrDA Tx/Rx header (CN8)
Pin Function
1 Vcc
2 No Connection
3Rx
4 GND
5Tx
1
5
CN8:
Vcc Rx GND Tx
External Speaker (CN7)
The CPU has its own buzzer. You can also connect to the
external speaker on your computer chassis. Pin assignments for
CN7 are the following:
External speaker (CN7)
Pin Function
1 Speaker out
2 No connection
3 GND
4 +5 VDC
28 PCA-6148/6148L User's Manual
Power LED and Keylock (CN6)
You can use a LED to indicate when the CPU card is on. Pin 1
of CN6 supplies the LED's power, and Pin 3 is the ground.
You can use a switch (or a lock) to disable the keyboard so the
PC will not respond to any input. This is useful if you do not
want anyone to change or stop running a program. Connect the
switch between Pins 4 and 5 of CN6.
Power LED and keylock (CN6)
Pin Function
1 LED power (+5V)
2NC
3 GND
4 Keyboard lock
5 GND
Chapter 2 Connecting peripherals 29
30 PCA-6148/6148L User's Manual
3
AWARD BIOS SETUP
This chapter describes how to set the
card’s BIOS configuration data.
Chapter 3 Award BIOS setup 31
CHAPTER
AWARD BIOS Setup
ROM ISA BIOS (2C4L6AK1)
CMOS SETUP UTILITY
AWARD SOFTWARE, INC.
STANDARD CMOS SETUP SUPERVISOR PASSWORD
BIOS FEATURES SETUP USER PASSORD
CHIPSET FEATURES SETUP IDE HDD AUTO DETECTION
POWER MANAGEMENT SETUP SAVE & EXIT SETUP
LOAD BIOS DEFAULTS EXIT WITHOUT SAVING
LOAD SETUP DEFAULTS
ESC: QUIT ���: SELECT ITEM
F10: Save & Exit Setup (Shift)F2: Change Color
Time, Date, Hard Disk Type....
Setup program initial screen
Award's BIOS ROM has a built-in Setup program that allows users
to modify the basic system configuration. This type of information
is stored in battery-backed RAM so that it retains the Setup
information when the power is turned off.
Entering setup
Turning on the computer and pressing immediately will
allow you to enter Setup.
32 PCA-6148/6148L User's Manual
Standard CMOS setup
Choose the "STANDARD CMOS SETUP" option from the
INITIAL SETUP SCREEN Menu, and the screen below is
displayed. This standard Setup Menu allows users to configure
system components such as date, time, hard disk drive, floppy
drive, display, and memory.
R O M I S A B I O S (2C4L6AK1)
S T A N D A R D C M O S S E T U P
A W A R D S O F T W A R E , I N C .
Date (mm:dd:yy) : Thu, Sep 12 1996
Time (hh:mm:ss) : 15 : 24 : 55
HARD DISKS TYPE SIZE CYLS. HEADS PRECOMP LANDZONE SECTORS MODE
Primary Master: Auto 0 0 0 0 0 0 AUTO
Primary Slave: Auto 0 0 0 0 0 0 AUTO
Secondary Master: Auto 0 0 0 0 0 0 --------
Secondary Slave: Auto 0 0 0 0 0 0 -------
Base Memory : 640K
Drive A : 1.44M, 3.5 in.
Extended Memory : 31744K
Drive B : None
Other Memory : 384K
Video : EGA/VGA
Total Memory : 32768K
Halt On : All Errors
ESC : Quit ��� : Select Item PU / PD / + / - : Modify
F1 : Help (Shift)F2 : Change Color
CMOS setup screen
Chapter 3 Award BIOS setup 33
BIOS features setup
By choosing the "BIOS FEATURES SETUP" option from the
CMOS SETUP screen menu, the following screen is displayed.
This sample scree contains the manufacturer's default values for the
PCA-6144V.
ROM ISA BIOS (2C4L6AK1)
BIOS FEATURES SETUP
AWARD SOFTWARE, INC.
Virus Warning : Disabled Video BIOS Shadow : Enabled
CPU Internal Cache : Enabled C8000-CBFFF Shadow : Disabled
External Cache : Enabled CC000-CFFFF Shadow : Disabled
Quick Power On Self Test : Disabled D0000-D3FFF Shadow : Disabled
Boot Sequence : C,A D4000-D7FFF Shadow : Disabled
Swap Floppy Drive : Disabled D8000-DBFFF Shadow : Disabled
Boot Up Floppy Seek : Enabled DC000-DFFFF Shadow : Disabled
Boot Up NumLock Status : On
Boot Up System Speed : High
IDE HDD Block Mode : Enabled
Gate A20 Option : Fast
Typematic Rate Setting : Disabled
Typematic Rate (Chars/Sec) : 20
Esc : Quit ���: Select Item
Typematic Delay (Msec) : 25
F1 : Help PU / PD / + / - : Modify
Security Option : Setup
F5 : Old Values (Shift)F2 : Color
OS Select for DRAM > 64MB : Non-OS2
F6 : Load BIOS Defaults
F7 : Load Setup Defaults
Virus Warning
During and after the system boots up, any attempt to write to the
boot sector or partition table of the hard disk drive will halt the
system. In this case, if Virus Warning is enabled, the following
error message will automatically appear:
!WARNING!
Disk boot sector is to be modified
Type "Y" to accept write or "N" to abort write
Award Software, Inc.
You can run the anti-virus program to locate the problem.
If Virus Warning is Disabled, no warning message will appear if
anything attempts to access the boot sector or hard disk partition.
34 PCA-6148/6148L User's Manual
CPU Internal Cache/External Cache
Depending on the CPU/chipset design, these options can speed up
memory access when enabled.
Quick Power On Self Test
This option speeds up the Power-On Self Test (POST) conducted
as soon as the computer is turned on. When enabled, BIOS
shortens or skips some of the items during the test. When disabled,
normal POST procedures assumes.
Boot Sequence
This function determines the sequence in which the computer will
search the drives for the disk operating system (i.e. DOS). The
default value is "C, A".
C,A System will first search the hard drive, then the floppy drive.
A,C System will first search the floppy drive, then the hard drive.
Boot Up Floppy Seek
During POST, BIOS will determine if the floppy disk drive
installed is 40 or 80 tracks. 360 KB type is 40 tracks while 720
KB, 1.2 MB, and 1.44 MB are all 80 tracks.
Enabled BIOS searches the floppy drive to determine if it is 40 or 80
tracks. Note that BIOS cannot differentiate 720 KB, 1.2 MB,
and 1.44 MB type drives as they are all 80 tracks.
Disabled BIOS will not search for the floppy drive type by track
number. Note that there will not be any warning message if
the drive installed is 360 KB.
Boot Up NumLock Status
The default is "On".
On Keypad boots up to number keys.
Off Keypad boots up to arrow keys.
Chapter 3 Award BIOS setup 35
Boot Up System Speed
High Sets the speed to high
Low Sets the speed to low
IDE HDD Block Mode
Enabled Enable IDE HDD Block Mode. BIOS will detect the block size
of the HDD and send a block command automatically.
Disabled Disable IDE HDD Block Mode
Gate A20 option
Normal The A20 signal is controlled by the keyboard controller or
chipset hardware
Fast Default: Fast. The A20 signal is controlled by Port 92 or
chipset specific method.
Typematic Rate setting
The typematic rate determines the characters per second accepted
by the computer. Typematic Rate setting enables or disables the
typematic rate.
Typematic Rate (Char/Sec)
BIOS accepts the following input values (character/second) for
Typematic Rate: 6, 8, 10, 12, 15, 20, 24, 30.
Typematic Delay (msec)
When holding down a key, the Typematic Delay is the time interval
between the appearance of the first and second characters. The
input values (msec) for this category are: 250, 500, 750, 1000.
36 PCA-6148/6148L User's Manual
Security Option
This setting determines whether the system will boot if the pass-
word is denied, while limiting access to Setup.
System The system will not boot, and access to Setup will be denied
if the correct password is not entered at the prompt.
Setup The system will boot, but access to Setup will be denied if
the correct password is not entered at the prompt.
Note: To disable security, select PASSWORD SETTING in the
main menu. At this point, you will be asked to enter a password.
Simply hit the key to disable security. When security is
disabled, the system will boot, and you can enter Setup freely.
OS select for DRAM>64 MB.
This setting is underOS/2 system.
Video BIOS Shadow
This determines whether video BIOS will be copied to RAM,
which is optional according to the chipset design. When enabled,
Video Shadow increases the video speed.
C8000 - CFFFF Shadow/DC000-DFFFF Shadow
These determine whether optional ROM will be copied to RAM in
blocks of 16 KB.
Enabled Optional shadow is enabled
Disabled Optional shadow is disabled
Chapter 3 Award BIOS setup 37
CHIPSET features setup
By choosing the "CHIPSET FEATURES SETUP" option from the
CMOS SETUP screen menu, the following screen is displayed.
This sample screen contains the manufacturer's default values for
the PCA-6148/6148L board.
ROM ISA BIOS (2C4L6AK1)
CMOS SETUP UTILITY
CHIPSET FEATURES SETUP
Auto Configuration : Enabled Onboard local bus IDE : Enabled
Decoupled Refresh : Enabled IDE Primary Master PIO : Auto
Relocate 256K/384K : Disabled IDE Primary Slave PIO : Auto
Video BIOS Cacheable : Enabled Onboard FDD Controller : Enabled
System BIOS Cacheable : Enabled
Onboard Serial Port 1 : COM1/3F8
On-board Serial Port 2 : COM2/2F8
External Cache Scheme : Write back Infra Red (IR) Function : Disabled
Combine Alter & Tag Bits : Enabled Onboard Parallel Port : 3BCH/IRQ7
CHRDY for ISA master : Enabled Onboard Parallel Mode : Normal
Memory Hole at 15MB Addr. : Disabled
Cache Timing Control : Normal IR Tansfer Mode : Half-Dup
DRAM Timing Control : Normal IR I/O Group : B
FAST DRAM : Enabled
Esc : Quit ���: Select Item
CPU Write Back Cache : Disabled
F1 : Help PU/PD/+/- : Modify
Set Turbo pin function : Suspend
F5 : Old Values (Shift)F2 : Color
Set Mouse Lock : Disabled
F6 : Load BIOS Defaults
Internal Flash/ROM Disk : Disabled
F7 : Load Setup Defaults
*
* Internal Flash/ROM Disk
Disable cannot use
Enable can use internal SSD
When internal RAM/ROM disk is disabled, the C8000h memory
segment can be used.
38 PCA-6148/6148L User's Manual
Video BIOS Cacheable
As with caching the System BIOS above, enabling the Video BIOS
cache will cause access to video BIOS addressed at C0000H to
C7FFFH to be cached, if the cache controller is also enabled.
Enabled Video BIOS access cached
Disabled Video BIOS access not cached
Disabled is the default.
System BIOS Cacheable
When enabled, accesses to the system BIOS ROM addressed at
F0000H-FFFFFH are cached, provided that the cache controller is
enabled.
Enabled BIOS access cached
Disabled BIOS access not cached
Disabled is the default.
Chapter 3 Award BIOS setup 39
Power management setup
The power management setup controls the CPU board's "green"
features. The following screen shows the manufacturer's default.
ROM ISA BIOS (2C4L6AK1)
CMOS SETUP UTILITY
POWER MANAGEMENT SETUP
Power Management : Enabled IRQ3 Activity : Primary
Doze Timer : 32 sec IRQ4 Activity : Primary
IRQ5 Activity : Primary
Sleep Timer : 2 min IRQ7 Activity : Primary
Sleep Mode : Suspend IRQ8 Activity : Secondary
HDD Power Management : Disabled IRQ10 Activity : Primary
VGA Activity Wakeup : Disabled IRQ11 Activity : Primary
IRQ12 Activity : Primary
IO Activity : Disabled
Esc:Quit ���: Select Item
F1 :Help PU/PD/+/-: Modify
F5 : Old Values (Shift)F2: Color
F6 :Load BIOS Defaults
F7 :Load Setup Defaults
Power Management
This option allows you to determine if the values in power manage-
ment are disabled, user-defined, or predefined. This category
determines the system's power consumption after selecting the
following items. Default value is disable. The following pages tell
you the options of each item and describe the meanings of each
option.
40 PCA-6148/6148L User's Manual
Power Management
Item Options Descriptions
Power Management 1. Disable Global power management
will be disabled
2. User Define Users can configure their
own power management
3. Min Saving Pre-defined timer values are
used such that all timers are
at their MAX value
4. Max Saving Pre-defined timer values are
used such that all timers are
at their MIN value
Doze Mode
Item Options Descriptions
Doze Mode Disable System will never enter DOZE
mode
Defines the continuous idle
8 sec
time before the system
32 sec
entering DOZE mode.*
2 min
8 min
16 min
Note: Normally, STANDBY
mode puts the system into
low speed or 8 MHz.
Chapter 3 Award BIOS setup 41
Standby Mode
Item Options Descriptions
Standby Mode Disable System will never enter
STANDBY mode
Defines the continuous idle time
8 sec
before the system enters
32 sec
STANDBY mode.**
2 min
8 min
16 min
Note: Normally, STANDBY
mode puts the system into low
speed or 8 MHz.
Suspend Mode
Item Options Descriptions
Suspend Mode Disable System will never enter
SUSPEND mode
Defines the continuous idle time
8 sec
before the system enters
32 sec
SUSPEND mode.***
2 min
8 min
16 min
Note: Normally, STANDBY mode
puts the system into low speed or
8 MHz.
42 PCA-6148/6148L User's Manual
Important Notice
The status of the following items will affect Doze Mode, Standby
Mode and Suspend Mode: PCI Master Activity, COM Ports
Activity, LPT Ports Activity, HDD Ports Activity, DMA Ports
Activity, VGA Activity, IRQ3 (COM2), IRQ4 (COM1), IRQ5
(LPT2), IRQ6 (Floppy Disk), IRQ7 (LPT1), IRQ8 (RTC Alarm),
IRQ9 (IRQ2 Redir), IRQ10 (Reserved), IRQ11 (Reserved), IRQ12
(PS/2 Mouse), IRQ13 (Coprocessor), IRQ14 (Hard Disk), and
IRQ15 (Reserved)
* If any of the above items are enabled and active, the
DOZE timer will be reloaded.
** If any of the above items are enabled or active, the
STANDBY timer will be reloaded.
*** If any of the above items are enabled or active, the
SUSPEND timer will be reloaded.
HDD Power Management
You can choose to turn the HDD off after a one of the time interval
listed, or when the system is in Suspend mode. If in a power saving
mode, any access to the HDD will wake it up.
Note: HDD will not power down if the Power Management
option is disabled.
IRQ Activity
IRQ can be set independently. Activity on any enabled IRQ will
wake up the system.
Chapter 3 Award BIOS setup 43
Load BIOS defaults
"LOAD BIOS DEFAULTS" indicates the most appropriate values
for the system parameters for minimum performance. These default
values are loaded automatically if the stored record created by the
Setup program becomes corrupted (and therefore unusable).
Load setup defaults
"LOAD SETUP DEFAULTS" loads the values required by the
system for maximum performance.
Password setting
To change, confirm, or disable the password, choose the "PASS-
WORD SETTING" option form the Setup main menu and press
[Enter]. The password can be at most 8 characters long.
Remember, to enable this feature. You must first select the Security
Option in the BIOS FEATURES SETUP to be either "Setup" or
"System."
IDE HDD auto detection
"IDE HDD AUTO DETECTION" automatically self-detect for the
correct hard disk type.
Save & Exit setup
If you select this and press the [Enter] key, the values entered in the
setup utilities will be recorded in the CMOS memory of the
chipset. The microprocessor will check this every time you turn
your system on and compare this to what it finds as it checks the
system. This record is required for the system to operate.
Exit without saving
Selecting this option and pressing the [Enter] key lets you exit the
Setup program without recording any new values or changing old
ones.
44 PCA-6148/6148L User's Manual
4
VGA Display Software/
Hardware Configuration
This chapter details the software configu-
ration information. It shows you how to
configure the board to match your
application requirements. AWARD
System BIOS is covered in Chapter 4.
Sections include:
• LCD display configuration
• Connections for two standard LCDs
CHAPTER
Introduction
The PCA-6148/6148L system BIOS and custom drivers are located
in a 128 Kbyte, 32-pin (JEDEC spec.) Flash ROM device, desig-
nated U7. A single Flash chip holds the system BIOS, VGA BIOS,
EEPROM Back-up and CMOS Data. The display can be config-
ured via software. This method minimizes the number of chips and
eases configuration. You can change the display BIOS simply by
reprogramming the Flash chip.
PCA-6148 Utility Disk
The PCA-6148 is supplied with a software utility disk that holds
the necessary file for setting up the VGA display controller. The
disk’s directory and file structure is as follows:
ROOT
SSD
MAKEROM.EXE
VGABIOS
AWDFLASH.EXE 48-CRT.BIN
48-EL.BIN 48-TFT.BIN
48-STN.BIN 48-MONO.BIN
MAKEROM.EXE
This program supports the SSD, and can be programmed by the
programmer.
48-CRT.BIN
Supports CRT only.
48-TFT.BIN (default)
Supports 640 x 480 color TFT
(Sharp LQ9D011, Toshiba LTM09C015A/016)
46 PCA-6148/6148L User's Manual
48-STN.BIN
Support 640 x 480 color STN DD 8/16-bit displays
(Sharp LM64C142)
48-MONO.BIN
Supports 640 x 480 dual scan monochrome displays
(Sharp LM64P8X/837)
48-EL.BIN
Supports 640 x 480 EL displays (PLANAR EL640480-A Series)
PCA-6148L Utility Disk
ROOT
SSD
MAKEROM.EXE
BIOS
AWDFLASH.EXE
6148L.BIN
VGA Display Software Configuration
The PCA-6148’s on-board VGA interface supports a wide range of
popular LCD, EL, gas plasma flat panel displays and traditional
analog CRT monitors. The interface can drive CRT displays with
resolutions up to 640 x 480 with 1.6 million colors. It is also
capable of driving color panel displays with resolutions of 800 x
600 in 64K colors. The VGA interface is configured completely
via the software utility, so you don’t have to set any jumpers.
Configure the VGA display as follows:
1. Apply power to the PCA-6148 with a color TFT display
attached. This is the default setting for the PCA-6148. Ensure
that the AWDFLASH.EXE and *.BIN files are located in the
working drive.
NOTE: Ensure that you do not run AWDFLASH.EXE
while your system is operating in EMM386 mode.
Chapter 4 VGA Display & Software/Hardware Configuration 47
2. At the prompt, type AWDFLASH.EXE and press .
The VGA configuration program will then display the
following:
FLASH MEMORY WRITER v. 5.3
Copyright © 1993, Award Software, Inc.
○○○○○○○○○○○○○○○○○○○○
For VT496G-2C4L6AKIC Date: 09/05/96
Flash Type -
File Name in Program:
○○○○○○○○○○○○○○○○○○○○
Error Message:
BIOS Update screen
3. At the prompt, type in the BIN file which supports your
display. When you are sure that you have entered the file
name correctly press . The screen will ask “Do you
want to save?” If you wish to continue press Y. If you change
your mind or have made a mistake press N to abort and end
the setup procedure.
4. If you decide to continue, the program will create a
BIOS.OLD file which contains the existing BIOS configura-
tion. The prompt will then ask “Are you sure you want to save
new configuration?” Press Y if you want the new file to be
written into the BIOS. Press N to exit the program.
The new VGA configuration will then write to the ROM BIOS
chip. This configuration will remain the same until you run the
AWDFLASH.EXE program and change the settings.
48 PCA-6148/6148L User's Manual
5
SVGA Setup (PCA-6148 only)
The PCA-6148 features an on-board flat
panel/VGA interface. This chapter
provides instructions for installing and
operating the software drivers on the
included display driver diskette.
Chapter 5 SVGA Setup 49
CHAPTER
Simultaneous display mode
The 65545/48/50 VGA BIOS supports monochrome LCD, EL,
color TFT and STN LCD flat panel displays. It also supports
interlaced and non-interlaced analog monitors (VGA color and
VGA monochrome) in high-resolution modes while maintaining
complete IBM VGA compatibility. Digital monitors (i.e. MDA,
CGA, and EGA) are NOT supported. Multiple frequency (multi-
sync) monitors are supported as analog monitors.
Both CRT and panel displays can be used simultaneously. The
PCA-6148 can be set in one of three configurations: on a CRT,
on a flat panel display, or on both simultaneously. The system is
initially set to simultaneous display mode. In the utility diskette,
there are three .COM files which can be used to select the
display. Simply type the filename at the DOS prompt:
CT.COM Enables CRT display only
FP.COM Enables panel display only
SM.COM Enables both displays at the same time.
50 PCA-6148/6148L User's Manual
Software support
The drivers support the following applications using the filenames
and resolutions listed:
Application Filename Resolution Colors
Windows 3.1 LINEAR4.DRV 640x480 16
800x600 16
1024x768 16
LINEAR8.DRV 640x480 256
800x600 256
1024x768 256
LINEAR16.DRV 640x480 64K
LINEAR24.DRV 640x480 16M
AutoCAD R12 RCTURBOC.EXP 640x480 16
800x600 16
1024x768 16
640x480 256
800x600 256
1024x768 256
640x480 32K
640x480 64K
640x480 16M
Lotus 1-2-3 2.0 and Lotus Symphony 1.0,1.1
V132X25.DRV 132x25 (Text) 16
V132X50.DRV 132x50 (Text) 16
VESA 1.2 VESA.COM 800x600 16
1024x768 16
640x400 256
640x480 256
800x600 256
1024x768 256
640x480 32K
640x480 64K
Chapter 5 SVGA Setup 51
Word 5.0 VGA600.VID 800x600 16
VGA768.VID 1024x768 16
Word 5.5 VGA55600.VID 800x600 16
VGA55768.VID 1024x768 16
WordPerfect 5.0 CHIPS600.WPD 800x600 16
CHIPS768.WPD 1024x768 16
WordPerfect 5.1 VGA600.VRS 800x600 16
VGA768.VRS 1024x768 16
Driver installation
Necessary prerequisites
The instructions in this manual assume that you understand
elementary concepts of MS-DOS and the IBM Personal Comput-
er. Before you attempt to install any driver or utility you should:
know how to copy files from a floppy disk to a directory on the
hard disk, understand the MS-DOS directory structure, and know
how to format a floppy disk. If you are uncertain about any of
these concepts, please refer to the DOS or Windows user refer-
ence guides for more information before you proceed with the
installation.
Before you begin
Before you begin installing software drivers, you should make a
backup copy of the display driver diskette and store the original
in a safe place. The display driver diskette contains drivers for
several versions of certain applications. You must install the
correct version in order for the driver to work properly so make
sure you know which version of the application you have.
52 PCA-6148/6148L User's Manual
Windows setup
These drivers are designed to work with Microsoft Windows 3.1.
You may install these drivers through Windows or in DOS.
Step 1: Install Windows as you normally would for a VGA
display. Run Windows to make sure that it is working correctly.
Step 2: Place the display driver diskette in drive A. In Windows
Program Manager, choose File from the Options Menu. Then
from the pull-down menu, choose Run . . . . At the command line
prompt, type A:\WINSETUP. Press the key or click
OK to begin the installation. At this point the setup program
locates the directory where Windows is installed. For proper
operation, the drivers must be installed in the Windows subdirec-
tory. Press to complete the installation. Once complet-
ed, the Display Driver Control Panel appears on the screen. This
Control Panel allows you to select and load the installed drivers.
Another method of installing these drivers is through the File
Manager. Click on Drive A:. Then double-click on
WINSETUP.EXE to begin installation.
Changing Display Drivers in Windows
To change display drivers in Windows, select the Windows Setup
icon from the Main window. You will be shown the current setup
configuration. Select Change System Settings from the Option
menu. Click on the arrow at the end of the Display line. You will
be shown a list of display drivers. Click on the driver you want.
Then click on the OK button. Follow the directions to complete
the setup.
Changing Color Schemes
After you change display drivers, you may notice that the color
scheme used by Windows looks strange. This is because different
drivers have different default colors. To change the color scheme,
select the Control Panel from the Main window. Select the Color
icon. You will be shown the current color scheme. Choose a new
color scheme and click the OK button.
Chapter 5 SVGA Setup 53
DOS Setup
Step 1: Install Windows as you normally would for a VGA
display. Run Windows to make sure that it is working correctly.
Then exit Windows.
Step 2: Place the display driver diskette in drive A. Type A:
to make this the default drive. Type SETUP to run the driver SETUP program. Press any key to get to
the applications list. Using the arrow keys, select Windows
Version 3.1 and press the key. Press the
key to select All Resolutions, and then press to begin the
installation. At this point you will be asked for the path to your
Windows System directory (default C:\WINDOWS). When the
installation is complete, press any key to continue. Press
followed by Y to exit to DOS.
Step 3: Change to the directory where you installed Windows
(usually C:\WINDOWS).
Step 4: Type SETUP to run the Windows Setup
program. It will show the current Windows configuration. Use
the up arrow key to move to the Display line and press . A list of display drivers will be shown. Use the arrow
keys to select one of the drivers starting with an asterisk (*) and
press .
Step 5: Follow the directions on the screen to complete the setup.
In most cases, you may press to accept the suggested
option. When Setup is done, it will return to DOS. Type WIN
to start Windows with the new display driver.
Changing Display Drivers in DOS
To change display drivers from DOS, change to the Windows
directory and run Setup, repeating steps 4 and 5 from the previ-
ous page. Besides the special display drivers marked by an
asterisk (*), you should be able to use the following standard
drivers:
VGA 640x480, 16 colors
Super VGA 800x600, 16 colors
54 PCA-6148/6148L User's Manual
Panning Drivers
Special panning drivers are provided to allow high-resolution
modes to be displayed on a flat panel or CRT. These drivers will
show a section of a larger screen and will automatically pan, or
scroll, the screen horizontally and vertically when the mouse
reaches the edge of the display.
Linear Acceleration Drivers
A special high-performance linear acceleration driver is provided
for 256-color modes. This driver may require special hardware
and may not be supported on all systems. It is only available for
Windows3.1.
Chapter 5 SVGA Setup 55
AutoCAD R12
These drivers are designed to work with Autodesk AutoCAD
R12. They conform to the Autodesk Device Interface (ADI) for
Rendering drivers and Display drivers. These display list drivers
accelerate redraw, pan, and zoom functions.
Driver installation
Step 1: Place the display driver diskette in drive A. Type A:
to make this the default drive. Type SETUP to run the SETUP program. Press any key to get to the
applications list. Using the arrow keys, select AutoCAD Release
12 and press . This will display a list of supported
driver resolutions. Using the arrow keys and the key,
select the resolutions that are appropriate for your monitor. When
all of the desired resolutions have been selected, press to
begin the installation. At this point you will be asked for a drive
and directory to copy the driver files. Enter the drive and directo-
ry that contains the installed AutoCAD R12. If the destination
directory does not exist you will be asked for confirmation. When
the installation is complete, press any key to continue. Press
followed by Y to exit to DOS.
Step 2: Go to the AutoCAD directory where the new drivers were
installed and run the driver installation program by typing
ACAD12 -r . This program will configure your
AutoCAD R12 to use the new display drivers. Select TurboDLD
Classic.
Configuring TurboDLD
Select Configure Video Display. In Display Device Configura-
tion choose Select Graphics Board/Resolution. Then choose
Select Display Graphics Board. After choosing a graphics board,
go to Select Display Resolution. After selecting the display
resolution, save the new configuration, and return to the main
menu.
56 PCA-6148/6148L User's Manual
Basic Configuration Menu
This menu allows you to modify:
Number of AutoCAD Command Lines
Font Size 6x8/8x8/8x14/8x16/12x20/12x24
Dual Screen Enable/Disable
User Interface Configuration
Double Click Interval Time
BP Button
BP Highlight Patt Line/Xor Rect/Both
BP Refresh Enable/Disable
BP Cache Enable/Disable
Expert Configuration Menu
This menu allows you to modify:
Display List Enable/Disable
Drawing Cache Enable/Disable
Use Acad 31 bit space? Yes/No
Internal Command Echo Enable/Disable
BP Zoom Mode Freeze/Float
Regen Mode Incremental/Fast
If your previously installed driver is not TurboDLD, you will
have to reconfigure the RENDER command the first time you use
it.
Chapter 5 SVGA Setup 57
Lotus 1-2-3 and Lotus Symphony
These drivers are designed to work with Lotus 1-2-3 versions 2.0,
2.01 and 2.2, and with Lotus Symphony versions 1.0 and 1.1.
Driver installation
Step 1: Place the display driver diskette into drive A. Make A the
default drive by typing A: . Run the SETUP program
by typing SETUP . Press any key to display a list of
supported applications. Use the arrow keys to select Lotus/
Symphony, and press . A list of supported screen
resolutions will be displayed. Use the arrow keys to select the
desired screen resolution and press . (Make sure your
monitor is able to display the resolution desired) Press to
begin the driver installation process. A default drive and directo-
ry path will be displayed. Use the backspace key to erase this
default and type in the 123 directory. At this point you may be
asked to create the target directory if it does not already exist.
After the files have been installed, press any key to return to the
list of supported applications. Press followed by Y to exit
to DOS. Copy all the files that were just created in the temporary
directory onto a formatted floppy diskette.
Step 2: Go to your 123 directory, and start the installation
program. Type the following commands:
C:
INSTALL
Step 3: The Lotus installation program will load and present the
installation menu. From this menu, select Advanced Options.
From the Advanced Options menu, select Add New Drivers To
Library. From the Add New Drivers Menu, select Modify
Current Driver Set. From the Modify Driver Set Menu, select
Text Display. From the Text Display menu, select one of drivers.
Step 4: After the selection of the appropriate VGA display driver,
you will need to exit this menu and return to the Main Lotus
Installation Menu. Do this by selecting Return To Menu.
Step 5: At the Main Lotus Installation Menu, select Save
Changes.
58 PCA-6148/6148L User's Manual
Step 6: At this point the Installation Menu will prompt you for
the name of your new Lotus configuration file. The Lotus system
will prompt you with the default value — 123.SET, but you may
want to use a filename that indicates the resolution of its driver.
For example, if you installed the 132 column by 25 line driver,
you could name this driver 132X25.SET, or if you installed the
80 by 50 driver, you may want to call the file 80X50.SET.
Step 7: The installation of your Lotus 1-2-3 driver is now
complete. You will need to exit the Lotus installation program at
this point. At the main Lotus Installation Menu, select Exit.
NOTE: If your driver set is not 123.SET, you have to type the
filename of your driver set in the command line when you start
Lotus 1-2-3. For example, if you named your driver set
132X25.SET, type the following to start Lotus 1-2-3:
123 132X25.SET
Chapter 5 SVGA Setup 59
VESA
The Video Electronics Standards Association (VESA) has created
a standard for a Super VGA BIOS Extension (VBE). This defines
a standard software interface to allow application programs to set
and control extended video modes, such as 800x600 graphics, on
video adapters from different manufacturers.
The VESA driver adds this Super VGA BIOS Extension to the
VGA BIOS. Any application program which supports the VESA
standard driver interface can be used with this driver. This VESA
driver conforms to the VESA Super VGA Standard #VS891001.
Driver installation
Step 1: Place the display driver diskette into drive A. Make A the
default drive by typing A: . Run the SETUP program
by typing SETUP . Press any key to display a list of
supported applications. Use the arrow keys to select VESA
Driver Version 1.2 and press . Press the
key to select All Resolutions, and press to begin the
installation. A default drive and directory path will be displayed.
Use the backspace key to erase this and type in a directory that is
in the directory path (such as C:\BIN or C:\UTILS). After the
files have been installed, press any key to return to the list of
supported applications. Press followed by Y to exit to
DOS.
Step 2: To install the VESA driver, type either VESA
or VESA + at the DOS prompt. The optional +
command line parameter enables all of the available modes.
Make sure that your monitor is capable of displaying these high
resolution modes before enabling them.
NOTE: If the video BIOS already supports VBE extended video
modes, DO NOT use this driver. Run the VTEST.EXE program
to see if the video BIOS supports the VBE modes.
60 PCA-6148/6148L User's Manual
Word
These drivers are designed to work with Microsoft Word 5.0 and
5.5.
Driver installation
If you have already installed Word on your computer, go to Step
2 to install the new video driver.
Step 1: Install Word as normal.
Step 2: After you complete the Word installation, place the
display driver diskette into drive A. Make A the default drive by
typing A: . Run the SETUP program by typing
SETUP . Press any key to display a list of supported
applications. Use the arrow keys to select Word and press
. Use the arrow keys to select the desired screen
resolution and press (make sure your monitor is able
to display the resolution desired). Press to begin the
driver installation process. A default drive and directory path will
be displayed. Use the backspace key to erase this and type in
your Word directory. After the files have been installed, press
any key to return to the list of supported applications. Press
followed by Y to exit to DOS.
Step 3: Copy the driver file for the desired resolution that was
just installed to SCREEN.VID.
Chapter 5 SVGA Setup 61
WordPerfect
These drivers are designed to work with WordPerfect 5.0 or 5.1.
They support 132-column display in editing mode, and high-
resolution graphics display in PreView mode.
Driver installation
Step 1: Place the display driver diskette into drive A. Make A the
default drive by typing A: . Run the SETUP program
by typing SETUP . Press any key to display a list of
supported applications. Use the arrow keys to select WordPerfect
and press . A list of supported screen resolutions will
be displayed. Use the arrow keys to select the desired screen
resolution and press (make sure your monitor is able
to display the resolution desired). Press to begin the
driver installation process. A default drive and directory path will
be displayed. Use the backspace key to erase this default and type
in the WordPerfect directory. At this point you may be asked to
create the target directory if it does not already exist. After the
files have been installed, press any key to return to the list of
supported applications. Press followed by Y to exit to
DOS.
Step 2: Start WordPerfect, and press + to enter the
setup menu. Select D for Display and G for Graphics Screen
Type, and then choose the desired Chips VGA resolution.
62 PCA-6148/6148L User's Manual
Configuring WordPerfect 5.0 for 132 columns
Follow these instructions to configure WordPerfect 5.0 for 132
column text mode:
Step 1: To use the SETCOL program to set 132 columns and 25
rows, type the following command:
SETCOL 132, 25
Step 2: Start WordPerfect. The program will detect the number
of rows and columns automatically. If for some reason WordPer-
fect is unable to adapt to 132 columns by 25 rows, start WordPer-
fect with the following command:
WP /SS=25,132
Configuring WordPerfect 5.1 for 132 columns
Start WordPerfect and press + to enter the setup
menu. Select D for Display and T for Text Screen Type and then
select Chips 132 Column Text.
Chapter 5 SVGA Setup 63
64 PCA-6148/6148L User's Manual
A
Flash/RAM/ROM Solid
State Disk
Appendix A Flash/RAM/ROM disk 65
APPENDIX
The PCA-6148/6148L features an internal Flash/RAM/ROM disk
drive. This drive emulates a floppy disk drive by using solid-state
memory chips (Flash, RAM or ROM) to store programs and data
instead of the magnetic particles on the mechanical drive’s disk.
The Flash/RAM/ROM disk offers much faster access times than a
floppy or hard disk and greatly increases reliability in harsh
environments.
The Flash/RAM/ROM disk works by modifying the BIOS INT-13
disk I/O routine on boot-up. The operating system must be DOS v.
5.0 or greater. The routine then translates read and write com-
mands to the disk so that they will correctly access the memory
chips. You don’t need any special drivers. You simply set the drive
to act as a DOS drive (e. g. A:, B:, C: or D: - 1st, 2nd, 3rd or 4th
floppy disks) and use standard DOS commands (COPY, DIR, etc.)
to manipulate your data.
Before you use the Flash/RAM/ROM disk, you will need to enable
it with the BIOS Advanced Setup Program, discussed in Chapter 3.
Memory devices
The Flash/RAM/ROM disk supports the following memory
devices, or their equivalents:
• 28F010 128 KB x 8 (+12 V) Flash Memory (AMD/INTEL)
• CXK581000P 128K x 8 SRAM (Sony)
• CXK584000P 512K x 8 SRAM (Sony)
• 27C010 128 KB x 8 EPROM
• 27C040 512 KB x 8 EPROM
• AT29C010/A 128 KB x 8 (+ 5 V) Flash Memory (ATMEL only)
• AT29C040/A 512 KB x 8 (+ 5 V) Flash Memory (ATMEL only)
If you use EPROM, files on the disk are read only. You will need
an "external programmer" to load your program and data files on
the EPROMs.
If you use +5 V Flash memories (AT29C010/A or AT29C040/A)
for the solid state disk, you can read or write data just like a floppy
66 PCA-6148/6148L User's Manual
disk; you need not use an external programmer. If you use +12 V
Flash memories (28F010) you will still need an "external program-
mer" to write data.
Drive capacity
The size of the emulated drive depends on the size and number of
the chips you install. For example, if you install three 512 KB
chips, you will have 3 x 512 KB = 1.536 MB, equivalent to a 1.44
MB floppy. If you install three 128 KB chips, you will have 3 x
128 KB = 384 KB, equivalent to a 360K floppy.
Drive configuration
Before you activate the Flash/RAM/ROM drive (using the BIOS
Advanced Setup program), you will need to set the drive's I/O and
memory addresses to avoid conflicts with other plug-in cards. You
will also need to set the DOS drive designation to be used by the
Flash/RAM/ROM drive. You can press - to enter SSD
setup mode when you see the message.
Internal Solid-State Disk BIOS Rev X.XX
"SSD assign to _: Hit , if you want
to setup SSD..."
You will need to set jumpers J17 and J18 to match the I/O. All the
devices must be the same type and size.
I/O address selection
J17 J18 I/O address (HEX)
Close Close Disabled (default)
Open Close 210-217
Close Open 220-227
Open Open 230-237
*This sentence will be shown when the battery voltage is low.
Appendix A Flash/RAM/ROM disk 67
On Board SSD Configuration V X.XX
SSD IC TYPE :
Memory segment windows (8K) :
SSD driver emulated :
Write to SSD EEPROM and exit
Do not write to SSD EEPROM and exit
↑↓ ↑↓ ↑↓ ↑↓ ↑↓ : Select PgUp/PgDn: Modify ESC: Abort
SSD Program allocate on C800 - CBFFH
I/O Address at 0210 - 0217 H
Please check battery, low voltage (less 2,5 V)*
SSD IC Type
SRAM 128K CXK581000P
EPROM 128K 27C010, 28F010
FLASH 128K AT29C010/A
SRAM 512K CXK584000P
EPROM 512K 27C040
FLASH 512K AT29C040/A
Memory segment windows (8K)
CE00-CFFF
D000-D1FF
D400-D5FF
D800-D9FF
DC00-DDFF
E000-E1FF
Drive emulated
Control the DOS drive emulated by the Flash/RAM/ROM disk:
1st, 2nd, 3rd or 4th.
SSD Driver Emulated
1st
2nd
3rd
4th
The actual drive letter assigned by DOS to the Flash/RAM/ROM
disk depends on the floppy or hard disks installed in the system.
68 PCA-6148/6148L User's Manual
Drive Selection
Floppy disks
The Flash/RAM/ROM disk will "replace" the corresponding
floppy disk. For example, if you have a single floppy disk (drive
A:) and assign the Flash/RAM/ROM disk to be the 1st drive, any
drive operations directed at drive A: will go to the Flash/RAM/
ROM disk.
Hard disks
The Flash/RAM/ROM disk will not replace corresponding hard
disks. Instead, DOS will assign the Flash/RAM/ROM disk to the
next free drive designation. For example, if you have a single hard
disk (drive C:) and assign the Flash/RAM/ROM disk to be the 3rd
drive, the Flash/RAM/ROM drive will become drive D:. If you
have two hard disks, the Flash/RAM/ROM drive will become drive
E:.
Example 1
You install the Flash/RAM/ROM disk as the first drive.
Before installing Flash/RAM/ROM disk
A B C
FDD FDD HDD
After installing Flash/RAM/ROM disk
A B C
Flash/RAM/ROM FDD HDD
*A floppy will be replaced by SSD
Example 2
You (try to) install the Flash/RAM/ROM disk as the third drive:
Before installing Flash/RAM/ROM disk
A B C
FDD FDD HDD
Appendix A Flash/RAM/ROM disk 69
After installing Flash/RAM/ROM disk
A B C D
FDD FDD HDD Flash/RAM/ROM
Solid State Disk (SSD) Formatting:
Formatting the Solid State disk
If you use Flash memory or SRAM, it is advisable to format the
Flash/SRAM disk before copying files to it. The DOS command is
as follows:
FORMAT drv: /u ...
where drv = solid state disk drive A, B, C etc.
Sometimes, it is better to assign the sectors and tracks when
formatting SSD. For the different disk size, please use different
assignment, for example:
Format drv:/u/n:9/t:40 (for 360 K disk)
Format drv:/u/n:18/t:80 (for 1.44 M disk)
where drv = solid state disk drive (A, B, or C, etc.)
After formatting, please read the message on the screen carfefully.
DOS will inform you how much disk space is available, the total
disk space, and the bad sectors, etc. If the disk size dow not match
your assignment, please check the SSD setup again.
If you need a bootable disk, you should do the system transfter by
typing:
SYS drv:
or use Format command and /S parameters.
70 PCA-6148/6148L User's Manual
Booting from the Flash/RAM/ROM disk
If you wish to have the system boot from the Flash/RAM/ROM
disk, simply set driver emulated number for the 1st FDD. Copy
your application files to the disk along with the standard system
files required to boot (command.com, io.sys, msdos.sys, etc). The
next time you start the system, it will boot from the solid state disk.
Inserting memory devices
After you’ve set all the jumpers and switches on the PCA-6148,
insert the appropriate memory devices into the card’s sockets.
Remember that you will need to program EPROMs before you
insert them.
1. Make sure that the pins of the memory chips are perpendicular
to the case and both rows are parallel to each other. Many times
the chips come with the pins spread out slightly. Place the chip
on a table top and carefully bend each line of pins together until
they point directly down.
2. Insert each chip. Align the chips so their pins are perpendicular
to the connector and the semicircular notch on the end of the
chip matches the notch on the end of the socket. There will
probably be a gap between the chip body and the socket when it
is fully seated – Do not push too hard!
3. When installing less than three memory devices, you must first
fill ROM-1SSD.
Appendix A Flash/RAM/ROM disk 71
SSD Jumper Setting
SSD Device Select [ J14 (U12), J16 (U16), J19 (U28)]
J14 (U12) J16 (U16) J19 (U28)
Flash open open open
ROM open open open
SRAM closed closed closed
SSD I/O address select (J17, J18)
SSD J17 J18
disabled closed closed
210H open closed
220H closed open
230H open open
SRAM Battery Source (J7)
If you install three SRAM chips, you must close jumpers J14, J16,
J19 and set J7. The will support SRAM power from the battery
that is used to retain the SRAM data when the PC's power is turned
off.
Set jumper J7 according to the battery type that will be used.
72 PCA-6148/6148L User's Manual
Battery Installation Setup (J7)
None (default) Internal 4 pin external 2 pin
external
Pin 1 SSD power
- + - +
Pin 2 Internal battery
Pin 3 SSD Power
4 1 4 1 4 1 4 1
Pin 4 GND
The battery should be disconnected when using non-volatile
memory devices such as Flash memories or EPROMs. You can
use 3 V or 3.6 V Lithium battery 2 pin or 4 pin connectors for
SRAM data retention power.
Note: Factory setting is "none battery" to save energy of the
on-board internal Lithium battery.
File copy utility
The utility program MAKEROM.EXE, included on the card's
utility disk, splits the files on a diskette into a series of binary files.
You can then use an external programmer to copy the files to
EPROM or +12 V Flash memory chips.
Appendix A Flash/RAM/ROM disk 73
Using a memory manager (EMM386.EXE)
If you are using an extended or expanded memory manager (such
as EMM386 or QEMM386), you will need to configure it to avoid
the addresses used by the Flash/RAM/ROM disk (SSD Data
memory segment). Otherwise, the memory manager will attempt to
use these addresses, causing unreliable operation.
For example, the line in your CONFIG.SYS file that invokes
EMM386, the DOS memory manager, might be the following:
DEVICE=EMM386.SYS X = D000 - D1FF
This excludes an 8 KB range for the card from D0000 to D1FFF
(the default addresses).
You should also make sure that the disk's memory address is not
shadowed in the BIOS. SSD program will occupy C8000 - CBFFF
when BIOS SSD setting is enabled.
74 PCA-6148/6148L User's Manual
B
Programming the
Watchdog Timer
The PCA-6148 is equipped with a
watchdog timer that resets the CPU or
generates an interrupt if processing comes
to a standstill for whatever reason. This
feature ensures system reliability in
industrial stand-alone and unmanned
environments.
Appendix
Programming the watchdog timer
If you decide to program the watchdog timer, you must write data
to I/O port 443 (hex). The output data is a value timer. You can
write from 01 (hex) to 3E (hex), and the related timer is 1 sec. to
63 sec.
After data entry, your program must refresh the watchdog timer by
rewriting the I/O port 443 (hex) while simultaneously setting it.
When you want to disable the watchdog timer, your program
should read I/O port 043 (hex).
The following procedure is a program for the watchdog timer:
Step 1 Out 443h data REM Start and reset the watchdog
timer.
Step 2 Your application program task #1
Step 3 Out 443h data REM Reset the timer
Step 4 Your application program task #2
Step 5 Out 443h data REM Reset the timer
Step 6 in 043h, REM Disable the watchdog timer
Data Values
01 1 sec.
02 2 sec.
03 3 sec.
04 4 sec.
.
.
.
3F 63 sec.
76 PCA-6148/6148L User's Manual
C
Upgrading
This appendix gives instructions for
increasing the capabilities of your CPU
card. It covers:
• Installing PC/104
• DRAM memory installation (SIMMs)
APPENDIX
Installing PC/104 modules (CN12,CN13)
The PCA-6148 card's PC/104 connector lets you attach PC/104
modules. These modules perform the functions of traditional plug-
in expansion cards, but save space and valuable slots. Advantech
modules include:
• PCM-3110 PCMCIA module
• PCM-3718 30 KHz A/D module
• PCM-3724 48-channel DIO module
PC/104 modules are produced by over a dozen manufacturers, and
the PC/104 form factor is being advanced as an appendix to the
ISA bus standard.
If you want to make your own PC/104 module, the figure on the
following page shows module dimensions. A PC/104 breadboard
module (PCM-3910) is also available. Pin assignments for the
connector appear in Appendix D. For further information, contact
your Advantech distributor or sales representative.
78 PCA-6148/6148L User's Manual
PC/104 module dimensions (mm)
Appendix C Upgrading 79
Installing DRAM (SIMMs)
You can use anywhere from 1 MB to 128 MB of DRAM with your
PCA-6148. The card provides four 72-pin SIMM (single in-line
memory module) socket that accepts from 1 to 32 MB SIMMs.
The following table shows the bank assignment for the SIMM
socket:
Bank SIMM socket(s) Size
0 SIMM0 72-pin
1 SIMM1 72-pin
2 SIMM2 72-pin
3 SIMM3 72-pin
You can use 256 KBx32, 256 KBx64, 1 MBx32, 1 MBx64, 4
MBx32 or 4 MBx64 DRAM SIMMs.
SIMM Configurations
Bank0 Bank1 Bank2 Bank3
S32 S32 S32 S32
D32 N/A D32 N/A
N/A D32 N/A D32
S32 = single side 32 bit
D32 = double side 32 bit
80 PCA-6148/6148L User's Manual
BANK0 BANK1 BANK2 BANK3 BANK4 TOTAL
1M -- -- -- 1MB
1M 1M -- -- 2MB
1M 1M 2M -- 4MB
1M 1M 4M -- 6MB
1M 1M 2M 4M 8MB
1M 1M 4M 4M 10MB
1M 1M 16M -- 18MB
2M -- -- -- 2MB
2M 2M -- -- 4MB
2M 4M -- -- 6MB
2M 2M 4M -- 8MB
2M 2M 4M 4M 12MB
2M 16M -- -- 18MB
2M 2M 16M -- 20MB
2M 2M 4M 16M 24MB
2M 2M 16M 16M 36MB
4M -- -- -- 4MB
4M 4M -- -- 8MB
4M 4M 4M -- 12MB
4M 4M 4M 4M 16MB
4M 16M -- -- 20MB
4M 4M 16M -- 24MB
4M 16M 16M -- 36MB
4M 4M 16M 16M 40MB
8M -- -- -- 8MB
8M -- 8M -- 16MB
16M -- -- -- 16MB
16M 16M -- -- 32MB
16M 16M 16M -- 48MB
16M 16M 16M 16M 64MB
32M -- -- -- 32MB
32M -- 32M -- 64MB
64M -- -- -- 64MB
64M -- 64M -- 128MB
Supported 36 bit Memory Configurations (single bank)
Appendix C Upgrading 81
82 PCA-6148/6148L User's Manual
D
Detailed system
information
This appendix contains information of a
detailed or specialized nature. It in-
cludes:
• Parallel connector pin assignments
• HDD connector pin assignments
• FDD connector pin assignments
• Keyboard connector pin assignments
• CRT display connector
• Flat panel display connector
• RS-232 connections
• PC/104 connector pin assignments
• System I/O port address assignments
• DMA channel assignments
• Interrupt assignments
APPENDIX
Parallel/printer connector (CN5)
Pin no. Signal
1 STROBE
2 DATA 0
3 DATA 1
4 DATA 2
5 DATA 3
6 DATA 4
7 DATA 5
8 DATA 6
9 DATA 7
10 - ACKNOWLEDGE
11 BUSY
12 PAPER EMPTY
13 + SELECT
14 - AUTO FEED
15 - ERROR
16 - INIT PRINTER
17 - SELECT INPUT
18-25 GROUND
HDD connector (CN3)
Pin no. Signal Pin no. Signal
1 - RST 2 GND
3D7 4 D8
5D6 6 D9
7 D5 8 D10
9 D4 10 D11
11 D3 12 D12
13 D2 14 D13
15 D1 16 D14
17 D0 18 D15
19 GND 20 N.C.
21 N.C. 22 GND
23 IOW 24 GND
25 IOR 26 GND
84 PCA-6148/6148L User's Manual
Pin no. Signal Pin no. Signal
27 IORDY 28 BALE
29 N.C. 30 GND
31 IRQ 32 -IO CS16
33 A1 34 N.C.
35 A0 36 A2 CS0
37 CSO 38 CS1
39 -ACT 40 GND
FDD connector (CN4)
Pin no. Signal
1-33 (odd) GROUND
2 HIGH DENSITY
4, 6 UNUSED
8 INDEX
10 MOTOR ENABLE A
12 DRIVER SELECT B
14 DRIVER SELECT A
16 MOTOR ENABLE B
18 DIRECTION
20 STEP PULSE
22 WRITE DATA
24 WRITE ENABLE
26 TRACK 0
28 WRITE PROTECT
30 READ DATA
32 SELECT HEAD
34 DISK CHANGE
Keyboard connector pin assignment (CN14, CN16)
CN14 CN16 Signal
1 5 CLOCK
2 1 DATA
3 (NC) 2 PS/2 DATA
4 3 GND
5 4 +5 V
6 PS/2 CLOCK
Appendix D Detailed system information 85
*VGA display connector (CN9)
PCA-6148 VGA display connector
Pin Signal Pin Signal
1 RED 9 N/C
2 GREEN 10 GND
3 BLUE 11 N/C
4 N/C 12 N/C
5 GND 13 H-SYNC
6 GND 14 V-SYNC
7 GND 15 N/C
8 GND
*Flat panel display connector (CN1)
PCA-6148 Flat panel display connector
Pin Function Pin Function
1 +12 V 2 +12 V
3 GND 4 GND
5 Vcc 6 Vcc
7 ENAVEE 8 GND
9P0 10 P1
11 P2 12 P3
13 P4 14 P5
15 P6 16 P7
17 P8 18 P9
19 P10 20 P11
21 P12 22 P13
23 P14 24 P15
25 P16 26 P17
27 P18 28 P19
29 P20 30 P21
31 P22 32 P23
33 GND 34 GND
35 SHFCLK 36 FLM
37 M 38 LP
39 GND 40 ENABKL
41 KB-DATA 42 KB-CLK
43 NC 44 NC
86 PCA-6148/6148L User's Manual
RS-232 connections
Different devices implement the RS-232 standard in different ways.
If you are having problems with a serial device, be sure to check
the pin assignments for the connector. The following table shows
the pin assignments for the card's RS-232 port:
RS-232 connector pin assignment (CN15, CN10)
Pin Signal
1 DCD
2RX
3TX
4 DTR
5 GND
6 DSR
7RTS
8 CTS
9RI
10 NC
5 9
1 2
3 4
5
6
7 8
6
1 9
10
CN15 CN10
Appendix D Detailed system information 87
RS-422/485 connector pin assignments (C11)
Pin RS-422/485 (CN11)
1 TX - or send data - (DTE)
2 TX + or send data + (DTE)
3 RX + or receive data + (DTE)
4 RX - or receive data - (DTE)
5 GND
6 DSR
7RTS
8 CTS
9RI
10 NC
1 2
3
4
5 6
7 8
9
10
CN11
88 PCA-6148/6148L User's Manual
PC/104 Connector Pin Assignments
CN12 CN13
0-- -- 0V 0V
1 IOCHCHK* 0V SBHE* MEMCS16*
2 SD7 RESETDRV LA23 IOCS16*
3 SD6 +5V LA22 IRQ10
4 SD5 IRQ9 LA21 IRQ11
5 SD4 -5V LA20 IRQ12
6 SD3 DRQ2 LA19 IRQ15
7 SD2 -12V LA18 IRQ14
8 SD1 ENDXFR* LA17* DACK0*
9 SD0 +12 MEMR* DRQ0*
2
10 IOCHRDY (KEY) MEMW* DACK5*
11 AEN SMEMW* SD8 DRQ5
12 SA19 SMEMR* SD9 DACK6*
13 SA18 IOW* SD10 DRQ6
14 SA17 IOR* SD11 DACK7*
15 SA16 DACK3* SD12 DRQ7
16 SA15 DRQ3 SD13 85V
17 SA14 DACK1* SD14 MASTER*
18 SA13 DRQ1 SD15 0V
2
19 SA12 REFRESH* (KEY) 0V
20 SA11 SYSCLK -- --
21 SA10 IRQ7 -- --
22 SA9 IRQ6 -- --
23 SA8 IRQ5 -- --
24 SA7 IRQ4 -- --
25 SA6 IRQ3 -- --
26 SA5 DACK2* -- --
27 SA4 TC -- --
28 SA3 BALE -- --
29 SA2 +5V -- --
30 SA1 OSC -- --
31 SA0 0V -- --
32 0V 0V -- --
* Low active single
--none
Appendix D Detailed system information 89
Memory Map (0-1 MB) System I/O port address assignments
Addr. range (Hex) Device
F0000h - FFFFFh System BIOS
C8000h - EFFFFh Unused
C0000h - C7FFFh VGA BIOS
A0000h - BFFFFh VGA display memory
00000h - 9FFFFh Base Memory
DMA channel assignments
Channel Function
0 Available
1 Available
2 Floppy
3 Available
4 [Cascade]
5 Available
6 Available
7 Available
90 PCA-6148/6148L User's Manual
IRQ/DMA detection interrupt assignments
Interrupt # Interrupt source
IRQ 00 Timer
IRQ 01 Keyboard
IRQ 02 [CASCADE]
IRQ 03 COM2 (2F8h)
IRQ 04 COM1 (3F8h)
IRQ 05 Available
IRQ 06 Floppy
IRQ 07 LPT1 (378h)
IRQ 08 Clock/Cal
IRQ 09 Available
IRQ 10 Available
IRQ 11 Available
IRQ 12 PS/2 mouse / available
IRQ 13 NPU
IRQ 14 OCCUPIED
IRQ 15 Watchdog/Available
Appendix D Detailed system information 91
92 PCA-6148/6148L User's Manual
E
POST LEDs
This appendix lists the codes generated by
the POST (Power On Self Test) routines.
It also discusses how to read the PCA-
6148's POST LED indicators.
APPENDIX
Whenever you start up your system, the CPU card runs a series of
programs to test and initialize board hardware. If the routines
encounter an error in during the tests, you will either hear a few
short beeps or see an error message on the screen. There are two
kinds of errors: fatal and non-fatal. The system can usually
continue the boot up sequence with non-fatal errors. Non-fatal
error messages usually appear on the screen along with the
following instructions:
press to RESUME
Write down the message and press the F1 key to continue the
bootup sequence. The cure for most nonfatal error messages is
simply to run the BIOS SETUP program, discussed in Chapter 3.
If the routines encounter a fatal error, they will stop the tests and
output a message indicating which test failed. If the fatal error
comes before the screen device initializes, the card will indicate
the error code through a series of beeps.
You can also determine the number of the test that failed by
reading the LED indicators on the top of the PCA-6148 board.
Please make a note of any POST codes before you contact
Advantech for technical support.
94 PCA-6148/6148L User's Manual
POST LEDs
Before the BIOS performs each system test, it writes a checkpoint
code to I/O address 80H. If the test fails, the code will stay in
memory. You can read the code and determine which test has
failed.
The PCA-6148’s POST LED indicators make this process ex-
tremely easy. You don’t need any special diagnostic tools, you just
read the POST code from the LEDs.
The table below shows how to read the LEDs, a series of eight
LEDs located in the top left-hand corner of the board.
SELF-TEST INDICATORS
LSB
l l l l l l l l
MSB
D1 D2 D3 D4 D5 D6 D7 D8
l : LIGHT OFF
¡ : LIGHT ON
l l l l : 0 l ¡ l l : 4 ¡ l l l : 8 ¡ ¡ l l : C
l l l ¡ : 1 l ¡ l ¡ : 5 ¡ l l ¡ : 9 ¡ ¡ l ¡ : D
l l ¡ l : 2 l ¡ ¡ l : 6 ¡ l ¡ l : A ¡ ¡ ¡ l : E
l l ¡ ¡ : 3 l ¡ ¡ ¡ : 7 ¡ l ¡ ¡ : B ¡ ¡ ¡ ¡ : F
EXAMPLE
lll¡ ¡l l¡
D7 D6 D5 D4 D3 D2 D1 D0
19
POST checkpoint LED indicators
The following list of POST codes gives the number of each
checkpoint for the AWARD BIOS POST. Codes are Copyright
AWARD-BIOS CHECK-POINT, (C) 1994 Award Software Inc.
Appendix E POST LEDs 95
Code Name Description of check-point
01 Processor test 1 Processor status (IFLAGS) verification
tests the following processor status flags,
carry, zero, sign, BIOS overflow. It will set
each of these flags, verify that they are
set, then turn each flag off and verify it is
off.
02 Processor test 2 Read, write, verify all CPU registers
except SS, SP, and BP with data pattern
FF and 00.
03 Initialize chips Disable NMI, PLE, ALE, UEL, SQWV.
Disable video, parity checking, DMA.
Reset math coprocessor, clear all page
registers, CMOS shutdown byte. Initialize
timer 0, 1, and 2. Set EISA timer to a
known state. Initiallze DMA controllers 0
and 1. Initialize interrupt controllers 0 and
1. Initialize EISA extended registers.
04 Test memory RAM must be periodically refreshed in
order to keep the memory from decaying.
Refresh toggle This function assures that the memory
refresh function is working properly.
05 Blank video Keyboard controller initialization. Initialize
keyboard.
06 Reserved
07 Test CMOS interface Verifies CMOS is working correctly.
Checks battery status, detects bad
battery.
08 Setup low memory Early chip set initialization memory
presence test. OEM chipset routines.
Clear low 64 KB of memory. Test first 64
KB memory.
09 Early cache initialization Cyrix CPU initialization, cache initializa-
tion
0A Setup interrupt vectors Initialize first 120 vectors in interrupt
vector table with SPURIOUS_INT_HDLR
and initialize INT 00h-1Fh according to
INT_TBL.
96 PCA-6148/6148L User's Manual
Code Name Description of check-point
0B Test CMOS RAM Test CMOS RAM checksum. If bad or
insert key pressed, INT OOh-1Fh
according to INT_TBL.
0C Initialize keyboard detect type of keyboard controller
(optional). Set num_lock status.
0D Initalize video interface Detect CPU clock. Read interface CMOS
location 14h to find out type of video in
use. Detect and initialize video adaptor.
0E Test video memory Test video memory, write sign-on
message to screen. Set up shadow RAM-
enable according to setup.
0F Test DMA controller 0 BIOS checksum test. Keyboard detection
and initialization.
10 Test DMA controller 1
11 Test DMA page registers Test DMA page registers.
12-13, 1B, 1E Reserved
14 Test timer counter 2 Test 8254 timer 0 counter 2.
15 Test 8259-1 mask bits Verify 8259 channel 1 masked interrupts
by alternately turning off and on the
interrupt lines.
16 Test 8259-2 mask bits Verify 8259 channel 2 masked interrupts
by alternately turning off and on the
interrupt lines.
17 Test 8259-1 mask bits Turn off interrupts then verify no interrupt
mask register is on.
18 Test 8259 interrupt Force an interrupt and verify the
functionality interrupt occurred.
19 Test stuck NMI bits Verify NMI can be cleared.
(parity/IO check)
1A Display CPU clock
20 Enable slot 0 Initialize slot 0 (system board).
21-2F Enable slots 1-15 Initialize slots 1 through 15.
30 Size base and extended Size base memory from 256 KB to
memory 640 KB and extended memory above
1 MB.
Appendix E POST LEDs 97
Code Name Description of check-point
31 Test base and extended Test base memory from 256 KB to
memory 640 KB and extended memory above
1 MB using various patterns.
Note: this will be skipped in EISA
mode and can be �skipped� with ESC
key in EISA mode.
32 Test EISA extended If EISA mode flag is set then test
memory EISA memory found in slot initializa-
tion. Note: this will be skipped in ISA
mode and can be �skipped� with ESC
key in EISA mode.
33-3B Reserved
3C Setup enabled
3D Initialize and install Detect if mouse is present, initialize
mouse mouse, install interrupt vectors.
3E Set up cache controller Initialize cache controller.
40 Virus protect Display virus protect disable or enable.
41 Initialize floppy drive Initialize floppy disk drive controller
and controller and any drives.
42 Initialize hard disk drive Initialize hard disk drive controller
and controller and any drives.
43 Detect & initialize Initialize serial/parallel ports (also
serial and parallel ports game port).
44 Reserved
45 Detect & initialize Initialize math coprocessor.
math coprocessor
46-47 Reserved
4E Manufacturing post loop Reboot if manufacturing loop post
or display messages loop pin is set. Otherwise display and
messages (i.e. any non-fatal errors
that were detected during post and
enter setup).
4F Security check Ask for password security (optional).
50 Write CMOS Write all CMOS values back to RAM
and clear screen.
98 PCA-6148/6148L User's Manual
Code Name Description of check-point
51 Pre-boot enable Enable parity checker, enable NMI,
enable cache before boot.
52 Initiallze option ROMs Initialize any option ROMs present from
C8000h to EFFFFh.
Note: when fscan option is enabled, it
will initialize from C8000h to F7FFFh.
53 Initialize time value Initialize time value in 40h: BIOS area.
60 Set up virus protection Set up virus protection according to
setup.
61 Set boot speed Set system speed for boot.
62 Set numlock Set numlock status according to setup.
63 Boot attempt Set low stack boot via INT 19h.
B0 Spurious If interrupt occurs in protected mode.
B1 Unclaimed NMI If unmasked NMI occurs, display "Press
F1 to disable NMI, F2 to reboot".
BE Chipset default Program chipset registers with
initialization power-on BIOS defaults.
BF Chipset initialization Program chipset registers with setup
values.
C0 Turn off chipset cache OEM specific-cache control.
C1 Memory presence test OEM specific test to size onboard
memory.
C5 Early shadow OEM specific early shadow enable for
fast boot.
C6 Cache presence test External cache size detection test.
E1-EF Setup pages E1-page 1, E2-page2, etc.
FF Boot
Appendix E POST LEDs 99
100 PCA-6148/6148L User's Manual


 Manufacturers
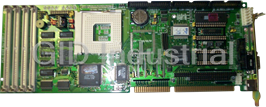


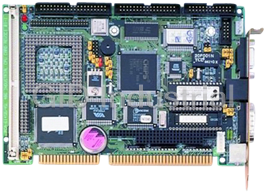

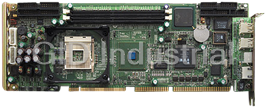

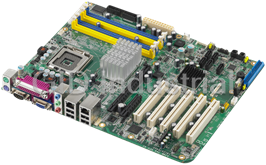


What they say about us
FANTASTIC RESOURCE
One of our top priorities is maintaining our business with precision, and we are constantly looking for affiliates that can help us achieve our goal. With the aid of GID Industrial, our obsolete product management has never been more efficient. They have been a great resource to our company, and have quickly become a go-to supplier on our list!
Bucher Emhart Glass
EXCELLENT SERVICE
With our strict fundamentals and high expectations, we were surprised when we came across GID Industrial and their competitive pricing. When we approached them with our issue, they were incredibly confident in being able to provide us with a seamless solution at the best price for us. GID Industrial quickly understood our needs and provided us with excellent service, as well as fully tested product to ensure what we received would be the right fit for our company.
Fuji
HARD TO FIND A BETTER PROVIDER
Our company provides services to aid in the manufacture of technological products, such as semiconductors and flat panel displays, and often searching for distributors of obsolete product we require can waste time and money. Finding GID Industrial proved to be a great asset to our company, with cost effective solutions and superior knowledge on all of their materials, it’d be hard to find a better provider of obsolete or hard to find products.
Applied Materials
CONSISTENTLY DELIVERS QUALITY SOLUTIONS
Over the years, the equipment used in our company becomes discontinued, but they’re still of great use to us and our customers. Once these products are no longer available through the manufacturer, finding a reliable, quick supplier is a necessity, and luckily for us, GID Industrial has provided the most trustworthy, quality solutions to our obsolete component needs.
Nidec Vamco
TERRIFIC RESOURCE
This company has been a terrific help to us (I work for Trican Well Service) in sourcing the Micron Ram Memory we needed for our Siemens computers. Great service! And great pricing! I know when the product is shipping and when it will arrive, all the way through the ordering process.
Trican Well Service
GO TO SOURCE
When I can't find an obsolete part, I first call GID and they'll come up with my parts every time. Great customer service and follow up as well. Scott emails me from time to time to touch base and see if we're having trouble finding something.....which is often with our 25 yr old equipment.
ConAgra Foods